

This is the third and last blog post in a series of three regarding the certification process that your product needs to go through before it becomes available on AppSource. In the first blog post I went through the overall process. In the second I described in detail how to create an AppSource package. In this third one I will tell you about the process from my perspective and summarize my findings.
Update 27th of June 2020: The ISV program was changed in July 2019. Read about the Microsoft Business Applications ISV Connect Program and how the Could Partner Portal now belongs to the history chapters here in my new article.
The AppSource publishing journey
On the 31st of May 2018 I applied to become a publisher, which is the first step in the certification process. I recieved an automatic response email from the “Marketplace Publisher Onboarding Team” and a few days later an email describing the coming steps.
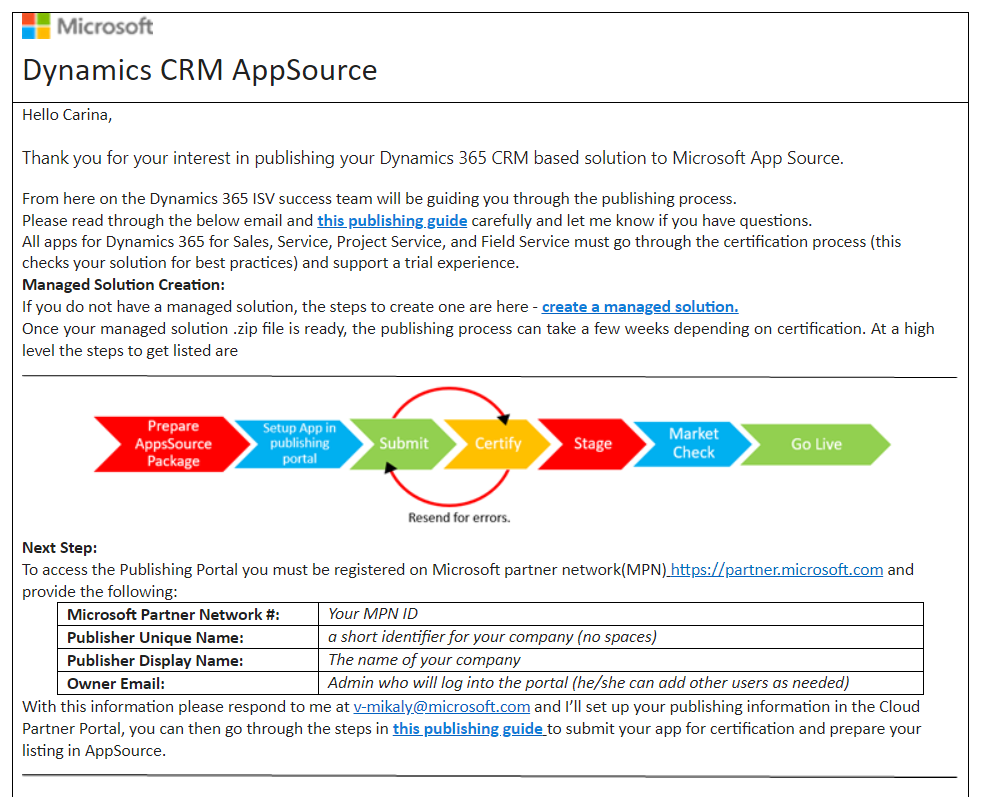
After becoming a publisher in the Cloud Partner Portal the work with creating the AppSource package began. It was first on the 16th of August that I submitted our offer though. Working with current customers simply had a higher priority and we usually have quite a long summer break here in Sweden, but still it took a lot of time before the offer actually was submitted. One of the other reasons?
Well, it kind of reminds me of baking. I admit that every now and then I start to bake something and a few minutes later it turns out that one or more of the ingredients are missing. Just before the summer break in 2018 I had finished working on our product as well as created and verified the AppSource package. I went to the Cloud Partner Portal to register an offer, just to realize that I had not read the whole recipe through. I had missed preparing some of the important parts.
Just as with baking, some parts can be improvised, some takes more time to get. E.g. missing an important ingredient can mean run to the grocery store. In the AppSource case, some information can be made up while you are registering the offer, some needs to be prepared more thoroughly. The next chapter will let you in on what might be good to prepare before registering an offer.
How to prepare for the offer registration
There are several things you need to prepare before you are ready to register your offer on the Cloud Partner Portal. I wish I had read though what you are supposed to fill in when registering an offer, that would have saved me some time. If I would have done that I simply could have acted as a TV chef on a baking show when registering our offer, having all the pieces already prepared.
Here follows a summary of what you can prepare before going and registering your offer.
- Offer summary and offer description – This is the text that will be displayed on your product page. Html format is allowed for the description. Choose your words wisely, these words are the same as those that will be used when getting a hit for your product when searching for apps.
- Search words – Speaking about finding you app. How will people find your app? This is how. (Ok – I just said that the words in the offer summary and description are used for this purpose, but anyway you also specify search words). There is a note “max 3” for the search words, but do not miss that there is a New button for adding additional search words.
- Screenshots – Up to 5 screenshots of your product (1280×720, .png format).
- Videos (optional). URL, YouTube och Vimeo. Thumbnail (1280×720, .png format).
- Marketing documents, max 3 (.pdf format).
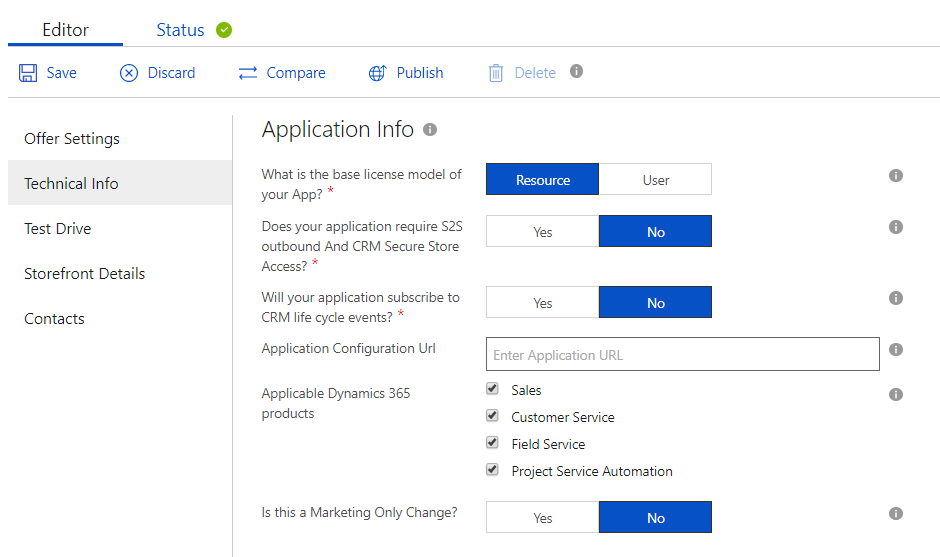
- Scenario and use case asset (optional) – a document which Microsoft can use for validation of the functionality. Download a template from Microsoft from the page where you register your offer. Includes a description of how you should describe e.g. the solution architecture, Canvas Apps, Flows, Model-driven apps etc.
- Logos 1. AppSource Package Icon (32×32 .png or .jpg format) – to include in the AppSource package, 2. Product and/or Company logo (255×115, .png format), 3. Offer logo (48×48, .png format), 4. Offer logo (216×216, .png format).
- Terms of use, yes, again, it is also included in the AppSource page (html format).
- Links – you need to specify URLs for the following; 1. Help link for your app, 2. Support URL, 3. Your app’s privacy policy URL
Crossing the finish line
On the 13th of February 2019 the AppSource team asked for a functionality demo of our product. They had then deployed our solution into a test environment. On the 27th of February I gave a demonstration online for Microsoft and after that they wanted me to send a description of the code that runs after the package has been installed. So I did and on the 15th of March our offer was available for us, i.e. in preview mode. We made a few minor changes to the offer, saved it and chose to activate it. On that same day it went live, yay!

Conclusions and thoughts
Make sure you have created your app according to best practise. No-code, low-code or code using a “supported” approach with the latest and the greatest from the SDK. Otherwise Microsoft will give you some homework. Take a look at the App Design Best Practices Checklist and the App Certification Checklist to get a hint on what Microsoft will include in the validation process.
When creating a managed solution for your product, make sure to pick a unique name (Dynamics 365 CE solution name), e.g. include your company name. We did not do this at first, noone complained until there was an error in the publishing process just before we were to go live. There was already a solution on AppSource with the exact same solution name. We had to create a new solution with a better name and make a new AppSource package.
As for creating the AppSource package, see my previous blog post. Most important here is to get all the pieces together and putting the files together correctly. Having problems with the Package Deployer tool when verifying your Dyanmics 365 package? Also see my previous blog post. E.g make sure you get the tool from nuget and do not use an older version of it as I did at first.
There are some options for recieving leads from your published offer, see Get customer leads.
This series of blog posts about AppSource has come to an end. Godspeed with publishing on AppSource, but whatever you do, make sure you enter the registration phase in no other way than as a fabulous TV chef.
More to read about this subject
Azure Marketplace Documentation

I’m more than happy to uncover this website. I wanted to thank you for ones time for this wonderful read!! I definitely enjoyed every little bit of it and i also have you saved to fav to see new information on your site.
LikeLike
I just noticed I missed to reply to this comment. Better late than never. 🙂 Thank you so much! I’m happy you have enjoyed reading my posts.
LikeLike