

This is the second blog post of three regarding how to publish an app on AppSource. In my previous blog post I went through the overall process. In this one I will let you in on the details regarding creating the AppSource package and verifying parts of it by using the Package Deployer tool. The last blog post will summarize my findings from publishing on AppSource.

This is a badge that you can use once your AppSource package has been approved, yay! Before you are entitled to use this badge you need to go through the certification process though and an essential part of it is to create the AppSource package.
Let us assume that you have already created a managed solution containing all the components needed for your product. The next step is to create a Dynamics 365 Package, which later will be a part of the AppSource package.
In my previous blog post I explained that installing an app from AppSource uses the same technique as when deploying a package using the Package Deployer tool. So now we will create such a package and then we can verify it by using the Package Deployer tool.
Templates for Visual Studio
In order to create a Dynamics 365 Package, download these templates to Visual Studio. The page says they work with VS 2012, 2013, 2015. I used them with no problems with VS 2017 though. Once you have the templates in place, create a new project in Visual Studio using the CRM Package template.

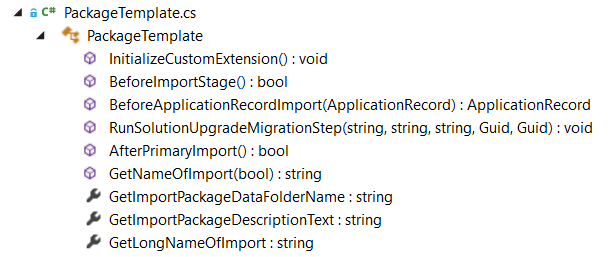
Clicking OK will create a new project and now you need to do some modifications to it. This is how it looks default.

What needs to be modified
Let us look at the content of the template project and what you need to modify. There is a file GettingStarted.htm which contains information about how to create and deploy your package. It gets opened when you create your product but you can always open it manually again at a later stage in order to read this information again.
The folder PkgFolder can be renamed to something that reflects your product. This is optional though. In our case we used CompanynameProductname. If you change it, you should also change the code in PackageTemplate.cs.

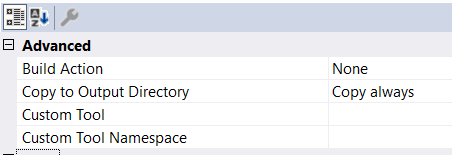
It is also in this folder that you add your managed solution file. Make sure to right-click on the file and choose Copy to Output Directory – Copy always.
The name of your solution file should be specified in the file ImportConfig.xml in the configsolutionfile tag. You can add other configuration values for the package in there as well and if you want to use the data migration tool and have sample data imported this is the place to specify information about that. Importing sample data in this way is optional.
In the HTML folders of the EndHtml and WelcomeHtml you add the welcome and end text that you want to be displayed in the installation wizard when your product is installed. Here you can specify e.g. what components are included, contact information, licensing information etc.
You have the possibility to add custom code which then will be run before, while, or after the package is deployed. We used this for creating a trial license key. We implemented the license functionality ourselves, in order to provide a 30 days trial period and to restrict the functionality after that period has ended. We added the code to run after the installation. Then the code is added to the AfterPrimaryImport method.
When you are done with these changes, build the project to create the package. You will then get a folder named ProductnameCompanyname – which will contain your solution files and some other stuff and an assembly e.g. CRMPackageMyProduct.dll which contains the custom code. Now you have created your Dynamics 365 package and the next step, before we can put together the AppSource package, is to verify your package.
Verify the Dynamics 365 package
In order to verify your package you will need a Dynamics 365 environment to which your can deploy your package. For instance you can create a Dynamics 365 trial environment. Next you will need the Package Deployer tool, which you get from here. Just follow the instructions in order to get the tool via Windows Powershell.

Navigate to the folder where the tools got downloaded. Add your package files (folder and .dll) to the same folder in which the file PackageDeployer.exe file is located. Then start the tool by double-clicking on the .exe file, login to our Dynamics 365 environment, follow the instructions and hope for the best. Hopefully your package will be deployed successfully.

If you get the below message, then you have not added the package files to the Package Deployment folder.

In the beginning, this tool and I were not friends at all. First I got it from the Dynamics 365 SDK but when I tried to use it, the application had a strange behaviour when I tried to logon to the Dynamics 365 CE environment. It was first when I downloaded the tool from nuget that I came one step further. However, I did not succeed all the way then either. I got this.

Trying to debug I noticed there was a System.NullReferenceException “Object reference not set to an instance of an object” Helpful? No. I noticed “An unhandled exception of type ‘System.NullReferenceException’ occurred in WindowsBase.dll”. Well, then I tried to use the application on another PC and tada, it worked fine and I did not dig any deeper into why this happened on my PC. Unfortunately I cannot give any clever advice here, other than make sure to download it from nuget and if you get the same error as me, just give it a try on another PC. 🙂
Instead of using the Package Deployer tool you also have the possibility to deploy your package using Windows Powershell, this is not something that I have tested though. When I finally got the application to work I just continued to use that same approach.
Getting the pieces together
Once you have verified that your product was deployed correctly you are finally ready to put together your AppSource package. It should contain the following.

It is important that the files are put together in the correct way, i.e. that the package is structured as an AppSource package is supposed to be structured. Otherwise the certification process will fail and your get some homework to do correcting this.
To create the package file, first create the [Content_Types].xml file. Then take the files from when you built your CRM package project (folder and .dll file) and create a new .zip file of those three package.zip. Then take that package.zip file and create a new .zip file where you bundle your package togheter with the [Content_Types].xml (again) an icon, your terms of use and a file input.xml, which contains information about your package and the contents of it. In there you specify e.g. the name of your Dynamics 365 solution file.
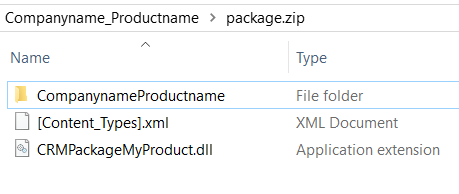
The file structure of the AppSource package should be as in the below picture, where Companyname_Productname is the name of the AppSource package and package.zip includes the output files from when the CRM package project was built and the [Content_Types].xml. Yes, the [Content_types].xml file should be included twice in the AppSource package.

The package.zip contains the following. The folder and the .dll file was created when building the CRM package project. The other file you create manually, the same file can be used twice in the file structure.
The AppSource package can now be uploaded to Azure and an offer can be registered on the Cloud Partner Portal. I described those steps in my previous blog post. You can read more about creating an AppSource package here. There you can also find examples of the files [Content_Types].xml and input.xml.
This was the second blog post of three regarding how to publish an app on AppSource. In my next blog post I will summarize my findings and let you in on how I experienced the whole certification process.

Do these processes apply for a canvas powerapps that uses sharepoint list as a datasource? I tried going through the processes and couldn’t see how to do it with a canvas powerapp.
LikeLike
Hi Maggie,
I assume Canvas Apps falls under the offer “Create a Dynamics 365 for Customer Engagement & Power Apps offer” – since Canvas Apps is one of the app types in Power Apps. The first part would be to create a managed solution which includes all parts. Please note that you have to think carefully around installation, e.g. make sure all needed parts are in the solution, do they need to do something with the connections after installation etc. Perhaps you should include some instructional text in your package about what is needed after the installation in order to get the connections to work properly.
Assuming you can use that offer type, you would need to include all parts in a solution and export it as managed, following this guide: https://docs.microsoft.com/en-us/azure/marketplace/partner-center-portal/create-new-customer-engagement-offer Here is a link for the step to create an AppSource package: https://docs.microsoft.com/en-us/powerapps/developer/common-data-service/create-package-app-appsource. Please note that I have two more recently written articles about AppSource 🙂 the first one is: https://carinaclaesson.com/2020/06/27/publishing-apps-on-appsource-getting-started-with-the-bizapps-isv-connect-program-part-1/
LikeLike