

For someone coming from the Dynamics CRM/xRM world, Model-Driven Apps are easy to grasp. It simply contains the same concepts that we are already familiar with, such as Sitemap, Dashboards, Forms, Views, Charts etc. Canvas Apps on the other hand, might be a bit overwhelming at a first glance. I cannot say I am fully there yet, all comfortable drawing canvases and adding formulas, but at least I have started my journey into this new and exciting world. Now that I have learned a bit about it, I thought I could write down some of my findings.
This will be a series of three blog posts. In this first one I will summarize what might be good to know if you are totally new to Canvas Apps. In the second blog post we will create a Canvas App from scratch, take a look at some basics, use the camera control and save data to the CDS. In the third and last blog post I will let you in on my findings about setting up a Custom Connector and utilizing it in a Canvas App.
It feels great to finally have taken the first baby step towards mastering the art of creating Canvas Apps, yay! A big thanks to my colleague Stina Persson for inspiration and support! You are a true Power Platform Rockstar!
From xRM to Power Platform
First a few words about the transformation from Dynamics xRM to the Power Platform. This is for all of you former xRM enthusiasts who are already familiar with the old Dynamics CRM/xRM platform but quite new to the Power Platform.
Dynamics xRM has evolved into parts of the Power Platform and nowadays we can find the old xRM parts mostly in the concepts of Model-Driven Apps and the Common Data Service (CDS), one of the differences being that the CDS and CDM in particular is built with the purpose of making it easier to utilize and combine data from different sources and it holds more information than just the Dynamics 365 CE data (even more than the x in the former xRM, e.g. since also Talent and Finance & Operations data have found its way into the CDS).
As for the CRM parts, we were used to them as being modules. Those modules have been transformed into a number of Model-Driven Apps built on the Power Platform. From Dynamics 365 for Customer Engagement version 9 there is a new user interface, Unified Interface, and that you can only get by creating Model-Driven Apps (or running any of the existing apps). Thus, exploring the existing and creating new Model-Driven Apps are quite intuitive for a former Dynamics xRM enthusiasts, such as myself.

The above picture illustrates that some concepts within the Power Platform originates from the Dynamics xRM platform and some do not. E.g. one part of PowerApps, Model-Driven Apps, comes from there, but the other part, Canvas Apps is a new concept.
MVP Alex Shlega is currently writing a very interesting e-book within this same subject. In fact, his e-book got me inspired for this chapter of this blog post. If you are a former xRM enthusiast like me, I can really recommend his e-book, for now available in draft mode. Perhaps you have just started taking the journey from on-premises to learning all the new possibilities that comes with the Power Platform and the cloud. Well, do not miss reading his words about it!
From Model-Driven Apps to Canvas Apps
As already mentioned, Model-Driven Apps are built up of the same concepts as were used to in the former Dynamics xRM platform as well as parts of the CDS. Thus, creating Model-Driven Apps for customer modifications and ISV products, in order to being able to scale down the solution and to and utilize the Unified Interface, is a piece of cake for someone used to the since long already existing concepts. With that said, at least one part of PowerApps is easy to handle. But what about the other half, Canvas Apps? Well, according to Satya Nadella it should be a piece of cake as well:
If you can do Excel and PowerPoint you can build apps
I guess I never got any good at writing those Excel formulas?! 😊 Well, anyway, I think I was just way too into Model-Driven Apps and those concepts. Once you have had a chance to get familiar with the PowerApps Studio you realize Satya is right. There are also a few tricks to your help when you want to become familiar with creating Canvas Apps. In the next chapter I will summarize where to find the documentation and what might be a good way to get started.
Getting started with Canvas Apps
First, make sure you have an environment to play with, e.g. a Dynamics 365 CE trial will do great. Then navigate to the maker portal: http://make.powerapps.com. Now you ready to explore! So, what might be good to know and think about?
Get over the fact that you do not start with the data model
In the model-driven world we already have our data model set up, or we do not, but if we do not then at least we start with describing and configuring the data model. With Canvas Apps you start with the User Interface and AFTER you have drawn your canvas, i.e. inserted the icons, buttons etc. THEN you add formulas in order to get some logic behind and get the magic happening. You should really think PowerPoint + Excel. First you draw your canvas, then you add formulas. At some point you will also need to specify the data source/s.
What is also worth mentioning is that with Model-Driven Apps you have either the CDS or virtual entities as data source. Usually the CDS and then you will need a data model in behind. With Canvas Apps, compared to Model-Driven Apps, it will probably more often be the fact that you do not have your own data model in behind, since you have both the provided data connectors as well as the possibility to create custom connectors.
Become friends with the new terminology and concepts
When you start to create Canvas Apps you need to get used to new concepts. Canvas Apps consists of different screens on which you can place forms, buttons, icons, images etc. and then you add formulas to get the different parts to behave like you want.
Think of the screens as PowerPoint slides, where you add pictures and text (in this case UI parts). Then you need to put formulas behind the different parts in order to get some logic, such as navigating between the screens, set filters, get data from a data source, save data etc.
Take a look in the documentation and when you are comfortable with the terminology, go hands-on with the PowerApps Studio and explore the building blocks. Or, if you are not the kind of person who reads manuals, skip the documentation part, go hands-on and use the documentation as a dictionary, e.g. for finding the right formula.
Take a moment to explore the building blocks
The below picture shows PowerApps Studio and an app with three screens (1): Browse Contacts Screen, Contact Details Screen and Edit Contact Screen. The Edit Contact Screen is currently displayed (2) and can be modified and the icon (3) icoSubmitForm is selected. In the formula bar (4) the formula for the property onSelect (5) is displayed, that is the formula for saving the data from the form into the CDS. On top the Insert menu alternative is chosen and under that menu you can choose to insert new screens, controls, icons etc. (6)

Explore the sample apps
When you create a Canvas App you can start from blank, from data or from a template. The fact that there are some templates provided – use this as an opportunity to get familiar with the building blocks and explore how the templates are built up.
Create a Canvas App from CDS data and check it out in detail
There is another way to easily explore the different building parts and that is to create a canvas app from CDS data. Then you get to choose an entity and you will get an app consisting of three different screens. Take some time to explore such an app as well, e.g. explore the formulas behind the different forms, icons etc.
Create a Canvas App from scratch
When you are comfortable with the building blocks, why not try to create one from scratch. Before you start, take a moment to think about what is needed. Which screens, how should the user navigate between the screens, what data input is needed from the user, what data sources do we need etc. This is something we will take a look at in my next blog post.
Some basics
Here follows some unstructured, high and low basics and good-to-know info. Simply some of the things I have learned while exploring Canvas Apps.
There are different settings for your app. Check out the App settings under File -> App settings. One example of what you can find under the Advanced Settings is “Improve data source experience and Common Data Service views”.

With that setting you get the “new experience” for selecting data source and you will also be able to filter a gallery with a view. See the Blog post about it from the PowerApps team.

You can use Themes in order to change the style of your app. For more styling, you can change the properties of the different components, such as colour, text size etc. In order to get consistency between different parts, take a look at these useful instructions: PowerApps blog, Design Gudiance Linking controls for easy design edits

Learn about variables and when to use those, see the docs. We will use a variable in my next blog post.
There is a ConfirmExit function you can use in order to prevent your app users from data loss. See the blog post about it form the PowerApps team.
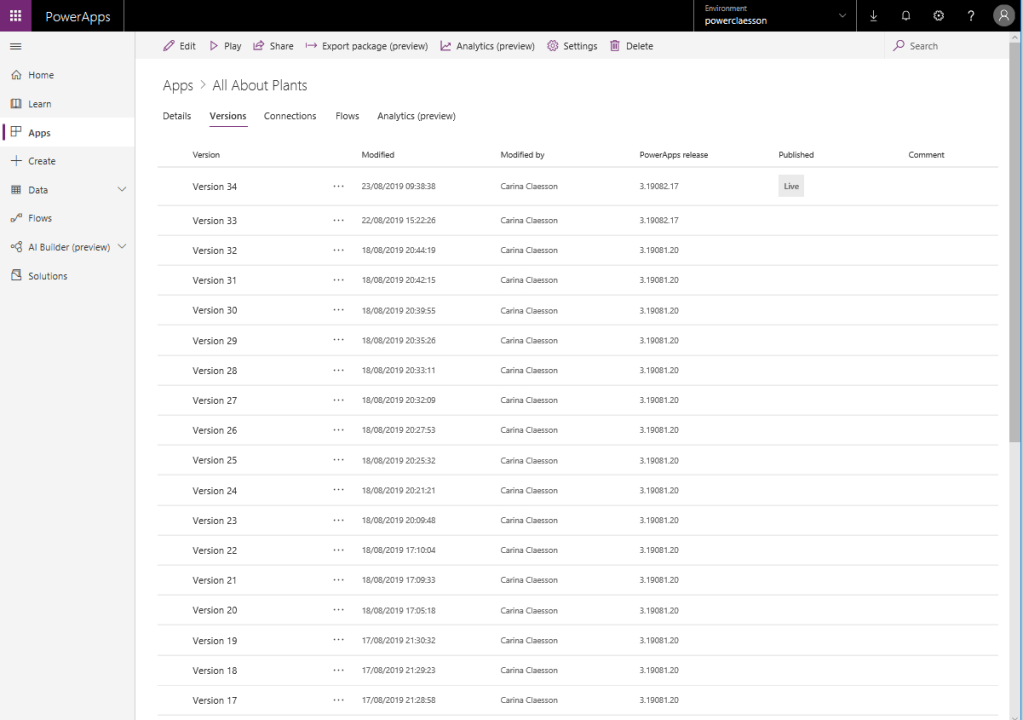
Each time you save a Canvas App a new version is created, but you will need to publish your app in order for the changes to take affect for the users. See the blog post about it from the PowerApps team.
Under Versions you get a summary of all the version of your App and you can see which one has been published (is Live). Oh my, version 34 of an app that I have made just for fun. This one you will get to see in my third blog post about Canvas Apps. 😉
There are three ways of saving your changes to the CDS. SubmitForm() saves the data and validates the logic applied for the data (required fields). Take a look at a generated from CDS data app and the Edit Screen. Behind the icon which saves the data SubmitForm() is used. You can also use the Patch function. See the docs. In my next blog post I will give an example of using the Patch function. Save the data by using a Microsoft Flow.
To be continued
I am very much aware of the fact that my journey with Canvas Apps has just begun and that I have so much more to explore and learn. Such as taking the next step after learning the basics, more about best practices, delegation, reusable components, how to get the apps to look more appealing etc. I am glad that I have started my journey though and I will keep Canvas Apps in mind when designing solutions for our customers. E.g. embedded Canvas Apps, I see a lot of potential in using those.
I have a little bit more to say about Canvas Apps at this moment and I will dedicate the two following blog posts to that. In my next blog post I will create a Canvas App from scratch and give an example of using the camera control and in the third and last blog post I will let you in on my findings from exploring custom connectors. How fun!
Stay tuned!
A list of great links
PowerApps Documentation – Startpage for the PowerApps documentation
PowerApps Canvas App Coding Standards and Guidelines – Canvas Apps Best Practices
Release Wave 2 2019, PowerApps – Read about what is coming
Formula Reference – Lookup the formulas
Microsoft Learn – Create PowerApps – A lot of step-by-step tutorials here
PowerApps blog – A must-follow! Get all the latest and the greatest news
PowerApps Optimization Techniques – One of many interesting blog posts
Step by Step Lab App in a Day – Material från the App in a Day course
Technical Journey Webinars – A lot of inspiring webinars
Technical Deep Dive on Creating PowerApps (Canvas Apps) – This one I really recommend.
PowerApps Community Announcements – Find out when helpful webinars will be held held
Dynamics 365 Community Events – Are there any upcoming events within your area?
The Power Platform World Tour sure seams like a lot of fun! Copenhagen is not too far from here. Too bad I am already booked for other stuff at those same dates.

8 thoughts on “How to make it from Model-Driven Apps to Canvas Apps”