

This is the third and last blog post in a series of three. These blog posts are all dedicated to describing my findings from exploring Canvas Apps. In the first one I summarized what might be good to know if you are totally new to Canvas Apps. In the second I gave an example of creating a Canvas App from scratch including using the camera control. In this third one we will look at setting up a Custom Connector from an OpenAPI file and utilizing it in a Canvas App and in your Microsoft Flows.
Connectors and Custom Connectors
There are 250 + predefined connectors that you can use in your PowerApps and in your Microsoft Flows. If you do not find any that suits your needs you have the possibility to create a Custom Connector.
A Custom Connector is a wrapper around a REST API (Logic Apps also supports SOAP APIs) that allows Logic Apps, Microsoft Flow, or PowerApps to communicate with that REST or SOAP API.
If that it perfectly understandable for you, great. If not – an API (Application Programming Interface) basically tells us how to interact with another application. It is like a specification of how you can access and exchange information with a certain application/data source. I think that Chris Hoffman made an excellent description of what an API is here.
Setting up a Custom Connector includes describing things related to the API, i.e. the API which we want to use in order to be able to connect to a certain application/data source. For instance to be able to get some information from another system into a Canvas App, embedded on a form in a Model-Driven App or not.

Custom Connectors in combination with the possibility to embed Canvas Apps in Model-Driven Apps gives us new perspectives on how to display information from other systems on a form in Dynamics 365 CE or in our own Model-Driven Apps.
When I started to explore Canvas Apps I got really curious about Custom Connectors and I just had to find out about how those work.
Finding an API
If it had started with a requirement from a customer, then I would have already known what to look for, e.g. what other application that was of interest. Perhaps the customer would have wanted to display ERP information in Dynamics 365 CE, cases from another case management system or integrate open/click rates from an external marketing tool etc. Now that I wanted to explore Custom Connectors for fun I needed to figure out what I wanted to display in my Canvas App.
Since I am not only a Power Platform enthusiast – but also a flower and plant enthusiast (read nerd) – I started to search for plant APIs. I found Trefle. I noticed that you can get an account for free and by that utilizing the API, great. A Custom Connector can be created from a Postman collection, from an OpenAPI file or from scratch. I noticed that from the Trefle site you can download an OpenAPI specification of the Trefle API, perfect, I had to try that out.
How to create a Custom Connector from an OpenAPI file
First, navigate to the maker portal https://make.powerapps.com. In the menu to the left, under Data, you have Custom Connectors. Clicking Add new Custom Connector gives you these choices:

To create a Custom Connector from an OpenAPI file, simply chose Import an OpenAPI file. Hopefully everything is fine and your connector is created. When I created one for Trefle, which was just before the summer, the file needed to match the OpenAPI 2.0 specification. I had to make some smaller adjustments to the file before it was imported correctly.

After you have chosen your file you are faced with a few pages that you need to go through in order for the Custom Connector to be created. You also have the possibility to get back to these later, to make updates to your Custom Connector.
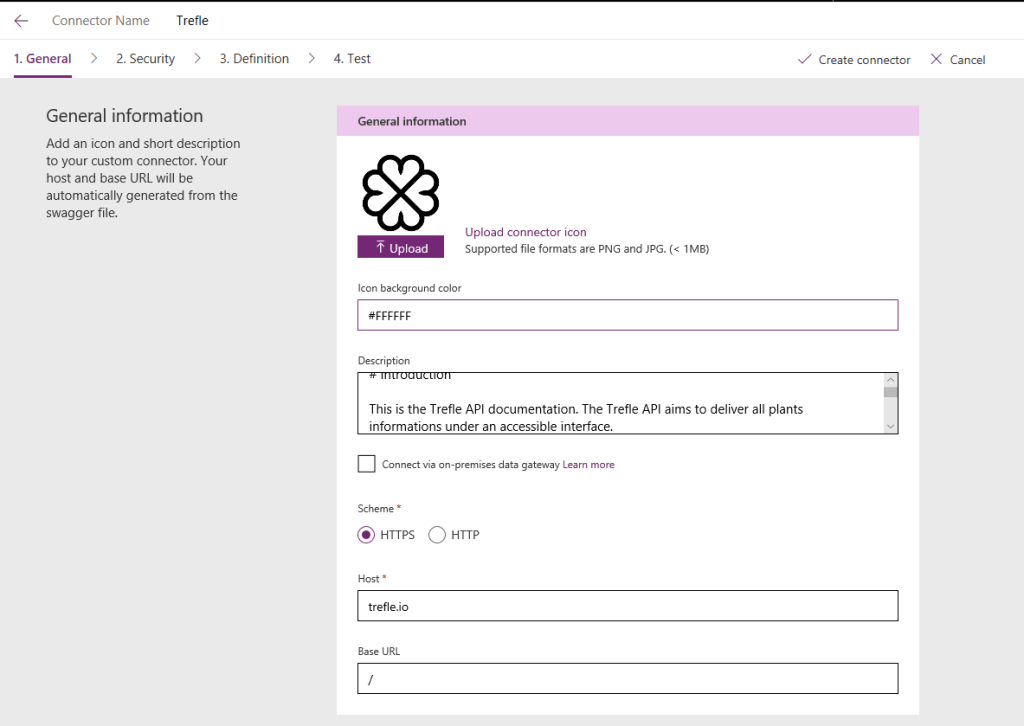
On the General page you get to choose an icon for your Custom Connector and you can choose a background colour for it. In the Trefle case most of the other info was added automatically, it was already specified in the OpenAPI file.
On the Security page you get to choose how to authenticate to the API. In the Trefle case this was already specified in the OpenAPI file and by that already filled in on this page. Trefle uses an API key and when you have created an account on the Trefle site you can access the API key under your account.

The Definition page contains details about what will be available for the Custom Connector when using it in e.g. a Microsoft Flow or a Canvas App. Here the requests and the expected responses are defined in detail. All of these actions where already specified in the OpenAPI. file in the Trefle case.


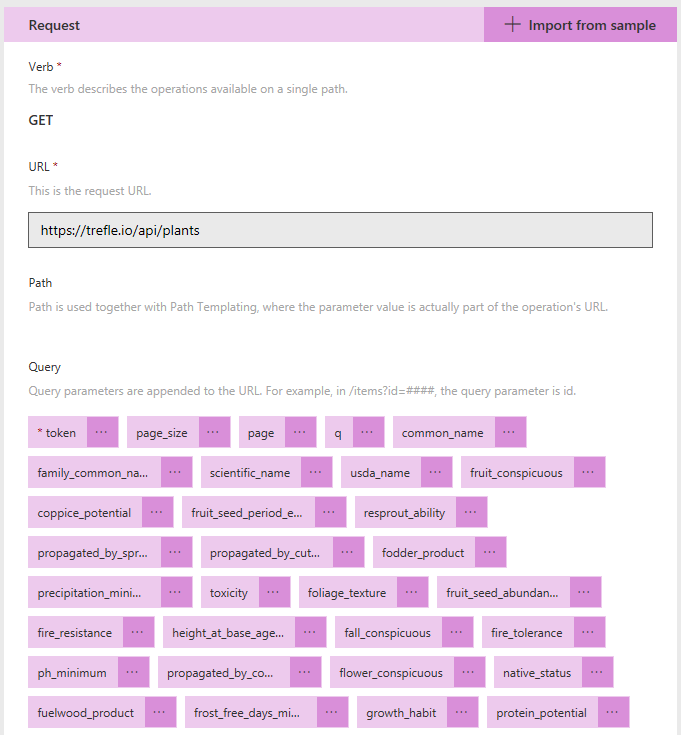
As already mentioned, creating a Custom Connector for the Trefle API meant importing an Open API file and the Custom Connector basically created itself. The request URL got filled in automatically. If you were to create a Custom Connector from scratch, then you whould have to study the API you have chosen and type in the URL manually here. Not too much of a job either I would say.

As for the responses it was the same thing there in the Trefle case, the responses were all magically created during the import from the OpenAPI file, how cool is that!

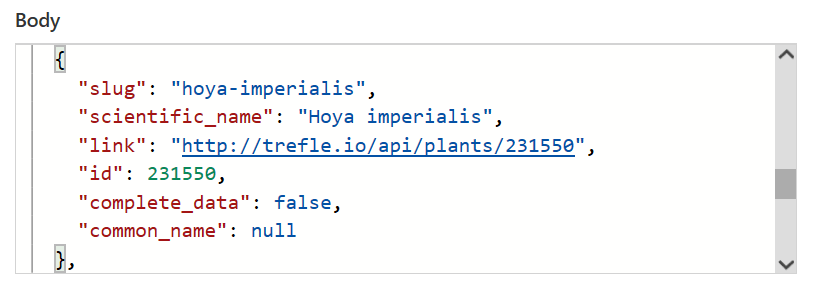
Under the Body part you can see what will be available as outputs, i.e. what information you will be able to retrieve to your PowerApp or in your Flow. You can also click on the … and you can see the format, like string, integer, boolean etc.

Next you can test your Custom Connector, but first you need to click on Create connector, otherwise you will get the following.

After testing the Custom Connector we have it all set up and we are ready to start using it.

Utilizing a Custom Connector in a Microsoft Flow
Lets us take a look at how the Custom Connector for Trefle looks like when using it in a Flow.
We will start from a Canvas App, with a button and that button will trigger a Flow. The thought is that we can continue to build on this App and utilize information from the Trefle API. For instance you could create an app where you can search for a plant name and you can get information about that plant, such as pictures of it, what family it belongs to, how to take care of it etc. But for now, let us just take a look at how the Custom Connector works.
As mentioned, I actually started from a Canvas App and the Flow is triggered when the users clicks on a button in that Canvas App. Except for the part where the flow is triggered from PowerApps, the Flow also consists of one action from the Trefle connector and one for the response.

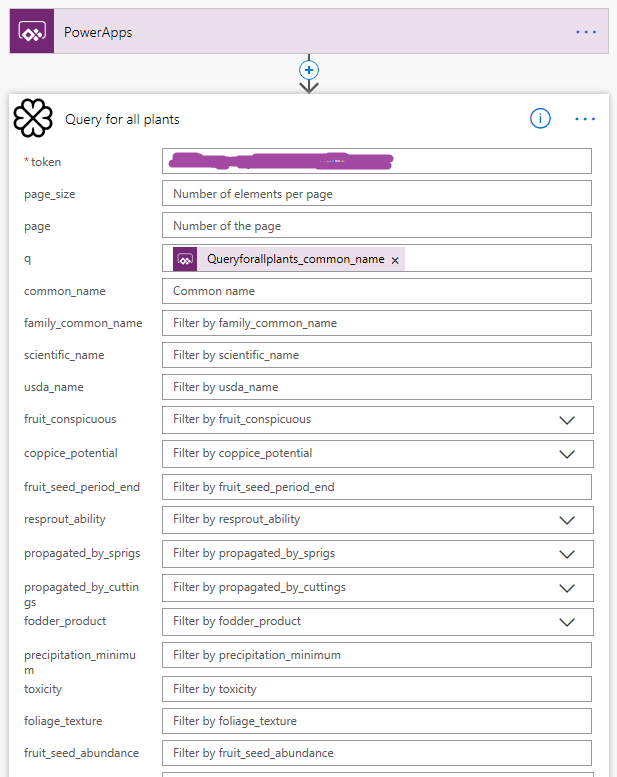
The Query for all plants action we recognize from setting up our Custom Connector. Now here you are able to set filters, e.g. letting the user type in a common name or scientific name in a text field and if you set it up as in the picture below (using q – this is all explained in the Trefle documentation) then you will get back a result consisting of all the plants with a common name or scientific name which matches what the user typed in.
Let us go back to the Custom Connector configuration and take a look at the Request for the Query for all plants action. Take a look under Query – you will find that the query parameters specified in the configuration are those that we are able to choose when working with the action in the Flow. Please note that not all of them are shown in the pictures.
As an example, running the app and searching for Hoya gives me the below result. I have already mentioned, I am not only a Power Platform enthusiast, I am also a plant enthusiast and yes I have had a lot of different Hoya plants in my collection over the years.

This is interesting facts for a Hoya enthusiast! The Trefle API holds information about 375 different Hoyas as I understand and here it is available to us on 13 different pages, 30 Hoyas per page, yay! I found one of my favourites in there as well, Hoya imperialis. I have had one of those for some years ago, got it to bloom after several years of taking care of it, well, that is a completely different story, very much out of scope here.
Back to the Trefle API, here I used the Query for all plants action, there is also a Query a plant action and then you get to specify the id of a certain plant, e.g. the id for Hoya imperialis. That gives you the detailed information about that plant, for anyone who is interested. 😉
By using the response method you should have the possibility to get the information back to your PowerApp. You can read about it here. I have not tested it more deeply though.
One other way to get info back from a Flow to a Canvas App is to use the Respond to PowerApps Action which you can read about here.
Utilizing a Custom Connector in a Canvas App
I have already explained how you can use the Custom Connector in a Flow and how you can have a button in your Canvas App and have a Flow in the background getting data from the API and passing data back to the PowerApp. That is one way of doing it.
Let us take a look at what you can do more from within the Canvas App. You can access the API through the Custom Connector in here as well, bu using the Custom Connector as a Data Source in your Canvas App.
Let us start with a button. Behind buttons we use formulas and when writing the formulas we can use the Cutom Connector and access those actions which are specified for the Custom Connector. E.g. by using the following formula: ClearCollect(plantInfo, Trefle.Showplant(txtSearchPlant.Text, apikey)) I was able to get the result into a collection “plantInfo” and then displaying the result in the Canvas App.
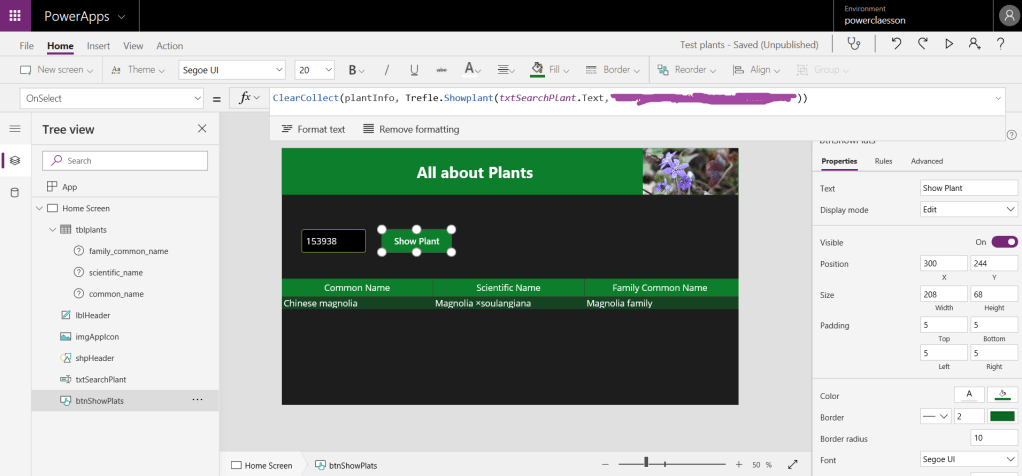
Please note, in the above example you search for an id of a plant. The user would not know that id of course, you would want to change that to letting the user search for e.g. common name/scientific name instead.
Anyway, it is really amazing how easily you can setup a Custom Connector from an OpenAPI file. As mentioned earlier, together with the ability to embed a Canvas App within a Model-Driven App, this definitely opens up new possibilities in integration scenarios and for displaying data from other systems on forms.
This was the third and last blog post of three regarding Canvas Apps and my findings from exploring those and from exploring Custom Connectors as well indeed. Thanks for taking time reading these posts. I hope you have learned something new.

10 thoughts on “Setting up a Custom Connector from an OpenAPI file and utilizing it in PowerApps and Flow”