

I have started to explore Canvas Apps and my findings from it is about to be documented in three different blog posts. In the first one I gave some suggestions on how to get started with Canvas Apps, written from the angle that you come from the model-driven world. In this second blog post we will take a look at some basics when creating a Canvas App from scratch, such as adding the different parts we need and type in some basic formulas. We will also make use of the camera control, how exciting!
Planning for a new Canvas App
First, let us do some planning. What do we want our app to do and what is needed to create such an app? In this example we will list contacts, open a contact, get some contact info and be able to take a photo with our app. The photo is to be saved to the CDS as the contact image.
This means we will have two different screens, one for listing contacts and one for displaying some contact details and on that same screen we should also be able to take a photo of the contact and save it. Ok, done with the planning.
Since I have already created this app while playing around with Canvas Apps, I will start by showing you how it works in action and after that we will take a closer look at how to build such an app.
Just to avoid confusion, in the sample screens below we actually start on a screen which displays some details about a certain account and you see a list of the account’s contacts. You can then navigate into a contact and in there you can take a photo of the contact and save it as the new contact image. With other words, this example actually contains more parts than what I will explain from scratch. Two screens will do just fine though for exploring some basics.
So, onto running the app. Let us assume that I have already been on a screen where I got a list of accounts and then I have chosen an account. On the screen I now see some account information and a list of contacts. This account only have one contact, Carina Claesson. I can see the contact image in this list.
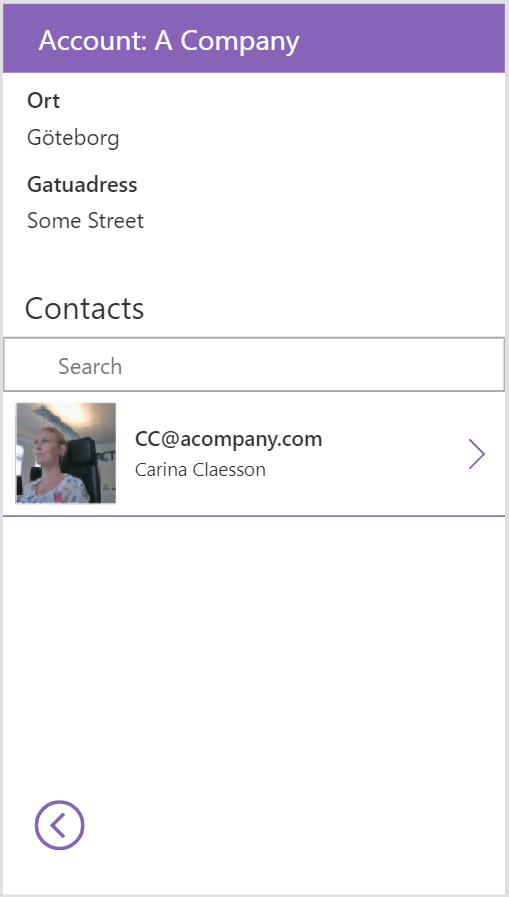
I have the possibility to navigate back to the account list and I also have the possibility to open the contact record. Let us open the contact record. On there I can see some contact details and I see the currect contact image. I also have a camera control with which I can take a photo and save to the CDS.
Use your imagination. If we have chosen to put an edit form here, then we could display any fields we want and let the user also update some contact information as well. Then of course we would need to save it somehow, in this example actually we save only the picture as you will see later. Without that we might as well have had a form which only displays the data. Well, this is just some examples, not a finished app. 😉
We could also choose to have a display form instead and just display some contact info. Or we could skip having a form and just use this screen for taking a new picture. Your choice. 🙂 As a header we get the name of the contact.
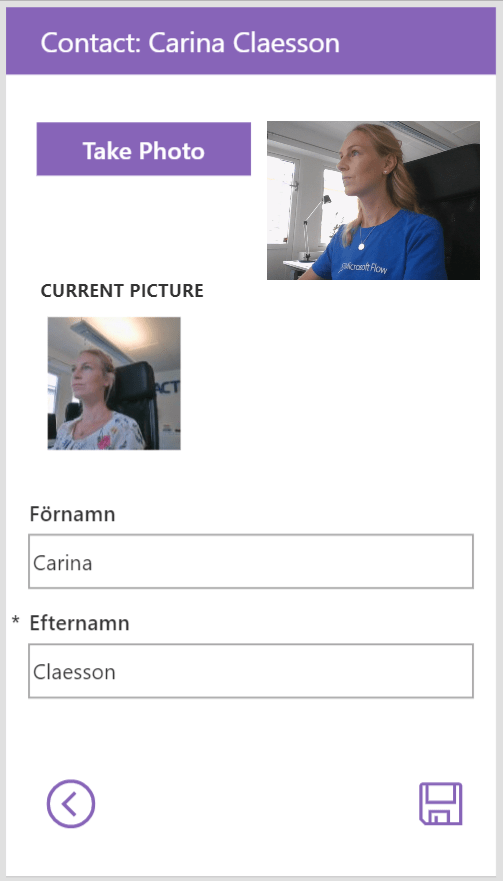
Comparing the existing contact picture with how the contact looks today, I can immediately see that the outfit of today is much better than it was on the day when I took that last picture of this contact. Let us take a new picture. Ok Carina, look into the camera and make sure your cool t-shirt fits in the camera. When clicking on the Take Photo button a photo is taken and displayed right below the camera control.
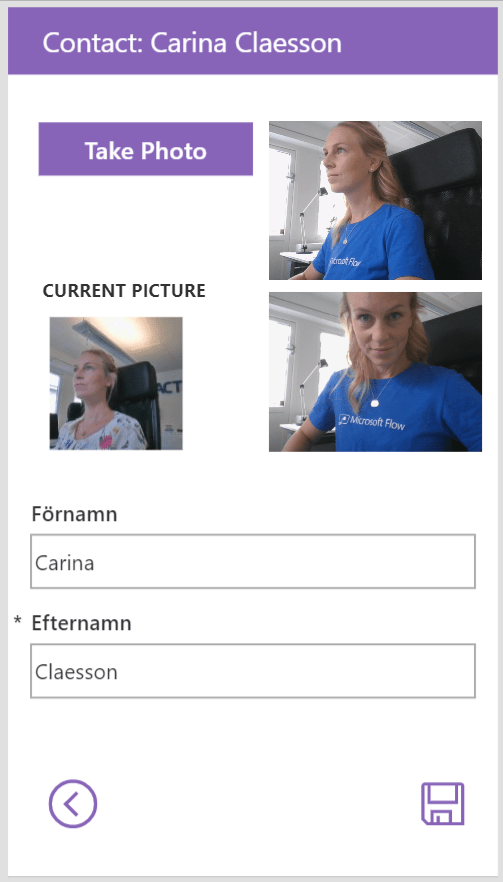
Perfect! Let us save this as the new contact image. Clicking on the save button will save this newly taken picture to the CDS as the contact image.
How to create the app from scratch
First, navigate to the maker portal https://make.powerapps.com. Go to Apps and choose to create a new app. Choose from blank and phone layout. Great, now you should have gotten the PowerApps Studio opened and you are ready to start and draw your canvas.
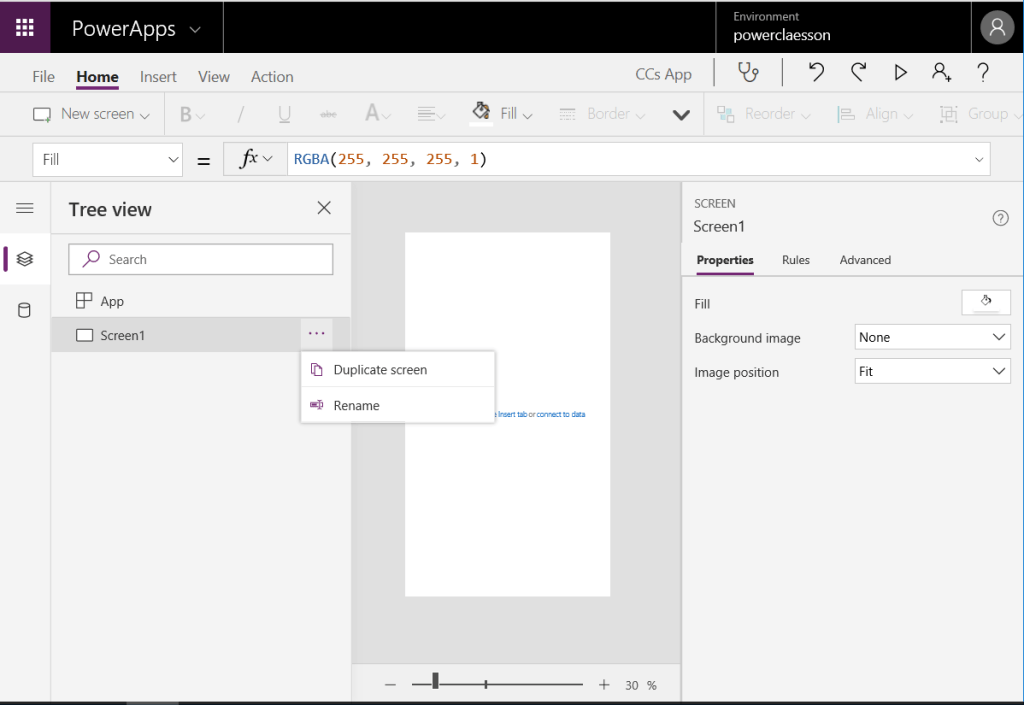
From start you get one Screen. Make it a habit to rename all the different pieces that you draw on your canvas and follow the naming conventions described here. Image when we have an app with lots of screens and lots of different components, using default names would cause a mess. So right-click on the … next to the Screen1 in the Tree view and rename it to e.g. List Contacts Screen.
As you have already seen, in this example we will use two different screens. One for listing contacts and one for the displaying some details about the contact and on the second you will also have the possibility to take a photo of the contact and save it to the CDS as the contact picture.
After we have added the screens we need and changed the default names to something better, we can focus on the first one that lists our contacts. So just choose this one in the tree view and we will make it display contacts. How? Insert a gallery and choose to take the data from the CDS and Entity Contacts. “Kontakter” – sorry, some parts are in Swedish.

Please note that I have used the “new experience” for data sources, you find this setting under File -> App Settings -> Advanced Settings. You chould choose Common Data Service and contacts.
When you have chosen CDS/Contacts as the data source you will see that the formula behind the items property will change to Contacts and the gallery will also display real data even though you are in a designer mode. You can change this formula if you want to filter the gallery, e.g. to display only active accounts. The setting for the “new experience” will also let you filter a gallery with a predefined view, which could be quite handy.
So far we have only one screen. Go and insert a new screen, a blank will do just fine. On this next screen, add a form and select contacts as data source. You will get to choose between an edit or display form, choose what type you want to use (i.e. do you want the users to be able to update some contact details as well or do you just want to display some data). Then choose what fields you want to include, e.g. Firstname and Lastname or something else of your choice.

Now we will add some more parts. On the Contact Details Screen we will insert a Button “Take Photo”, a camera control, two images (one for displaying the photo which has been taken and one for displaying the current contact picture), one Icon for navigating back and one Icon for saving the new picture we have taken and labels on top in order to get a header.
We will also need to put some formulas behind all of these. So go and draw your canvas and then add the formulas. I will give some examples with pictures below for the different parts including the formulas. Again, please not that the app below contains some more screens than the one that lists contacts and the one where contact details is displayed and we can take the photo.
Let me start with explaining the formula behind the Take Photo button.
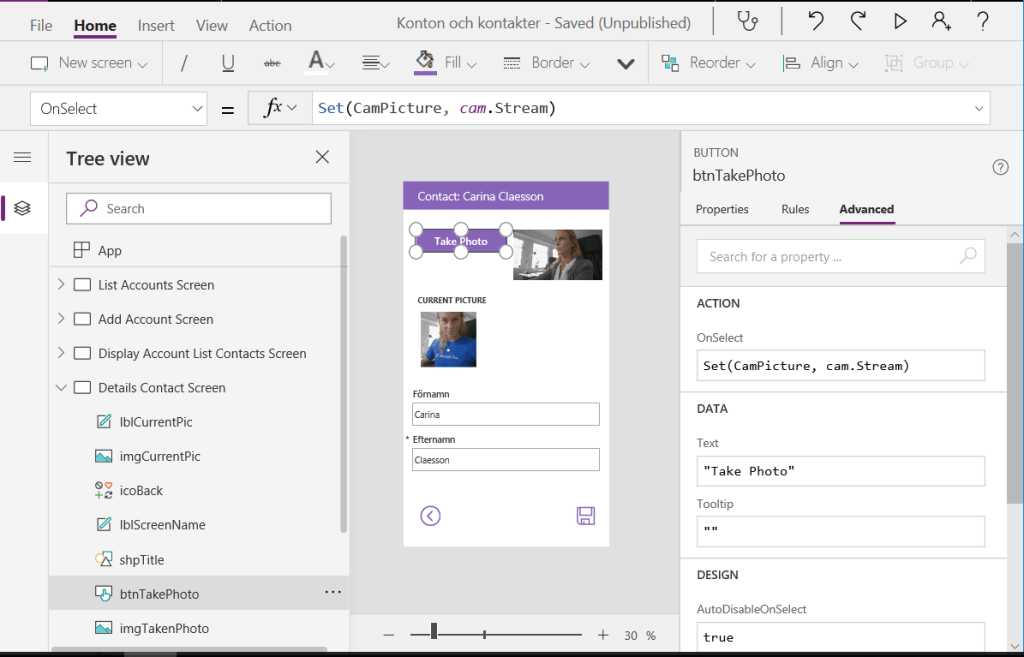
Make sure the button Take Photo is marked. You see that both in the Tree view as well as on the screen. For OnSelect we add the formula Set(CamPicture, cam.Stream). The Set function sets a global variable, in this case CamPicture to cam.Stream. cam is our camera control.
Basically you set the value of the global variable with the Set function and you do not need to declare it, just use the Set function. There are more alternatives which you can use for setting variables, see Working with variables. One other thing to mention here is that you find your variables under File -> Variables.
Next, let us take a look at the image where we want to display our taken photo.

Now let us take a look at how we can display the current contact picture.

For the current picture we want to display the contact image as it is today. This can be achieved by setting Image to the current record’s entity image. We reach the current record with galContact.Selected (which means the gallery from the first screen and what we have selected in order to come to this screen) and from that we reach the correct field Entity image (Entitetsbild in Swedish 😉).
In order to save the picture to the CDS we use the Patch function. We also add a Navigate function so that once you have saved the image you will navigate back to a certain screen.

We mark the save icon and set OnSelect to the Patch function. As I mentioned in my previous blog post, the Patch function is one way to save data to the CDS. Other ways are to either use the SubmitForm function e.g. in order to save data from a form or to use a Microsoft Flow behind the button. Now let me explain the different parts of the Patch function.
The first parameter is the entity which we want to save to, in this case Kontakter (Contacts), the second is the record we want to save changes to, in this case galContacts.Selected, which has already been explained. The third parameter is a combination of what field we want to update, here Entitetsbild (Entity Image) and the value we want to update it with, here CamPicure. As you probably remember, CamPicture is the variable that we set when we took the picture.
In the next chapter you will find a summary of the formulas that I have used in this example.
Formula Summary
Button for taking the photo, the onSelect property set to: Set(CamPicture; cam.Stream)
Displaying the name of the Contact that was chosen as a title on our Contact Details Screen. It is a Label and the Text has been set to: “Contact: ” & galContacts.Selected.’Fullständigt namn’
Navigating between screens: Navigate(‘List Accounts Screen’; ScreenTransition.Fade). You can also use the Back function. Read about the navigate and back functions.
Using the Patch function for saving the picture in the CDS: Patch( Kontakter; ContactsGallery.Selected; { Entitetsbild: CamPicture } ) ;
Read more about saving data using Submitform.
Now an example which is out of scope here. Remember I mentioned my example was a little bigger than two screens. This is an example of how to filter the gallery which displays contacts on a screen which also display some account information, i.e. to set a filter so that you only see the contacts of a certain account. This was the first picture of this blog post.
In the filter function the first parameter is the entity, the rest are the conditions. So here we have the entity Kontakter (Contacts). We want the company that is connected to the contact to be the account that we selected in the account gallery. Below it is also added that the field for email on the contact should start with whatever is in the search field, which means when using the search field and typing in Car we will get the hit Carina Claesson is Carina has an e-mail that starts with car hits for the e-mail.
Something that needs an explanation here is why you need the AsType when choosing the company name. It took me a while to figure out that this is needed. It is because the field Company on the contact is a polymorphic lookup. And what does that mean? Basically it means that the field ParentCustomerId is of type “Customer” and that means that it is not neccesarily an account, it could also be a contact. Read more about AsType here and more about field types here.
Filter(Kontakter; AsType(Företagsnamn; [@Konton]).accountid = galActiveAccounts.Selected.accountid; StartsWith(‘E-post’; txtSearchBox.Text))
Another example of how to do the setup of a gallery and a search field is what you get as default when generating an app and choosing contacts, then you get the following for the gallery, on property Items:
SortByColumns(Search(Kontakter; TextSearchBox1.Text; “address1_city”;”address1_composite”;”address1_country”); “address1_city”; If(SortDescending1; Descending; Ascending))
Read more about setting Filters and related topics here.
In order to prevent that you take a picture of one contact, navigate back to the list of contacts, and open another contact and ooops there on the image which displays the taken photo the last taken photo is displayed (the variable we set) we will need to clear the variable at some point. I added it on the gallery on the next arrow:
Navigate(‘Details Contact Screen’, ScreenTransition.None) ; Set(CamPicture, “”)
Create attachments from the Camera Control
There is another blog post related to this subject which I think is worth mentioning and that is an example of saving pictures as attachments. I have not tested it myself. I just stumbled into it and thought it was an interesting blog post. It is over one year old though and we all know that things change quickly around here, but perhaps this blog post is still useful – at least the main concepts – for those who might want to be able to create attachments from pictures taken within an app. Here it is!
About the Contact image
In the 2019 release wave 2 plan you can read about the LinkedIn Sales Navigator integration enhancements. Worth mentioning is that the contact image will be automatically synced with LinkedIn. I guess if you have the Sales Navigator you will not need this app. 😉 Here you can read this:
If organizations have enabled the sync, profile photos from LinkedIn will show as the contact picture within Dynamics 365. This will replace any existing picture that has been uploaded as the contact picture.
Well, this app was not meant to be very useful, it’s purpose was more to teach me (and whoever reads this) some basics about Canvas Apps. To learn more about the basics I really recommend to create an app from CDS data and explore the details as well as exploring the templates.
To be continued
This was the second blog post of three regarding Canvas Apps and some of my findings so far. Basics, still you need to start somewhere. I have also taken some time to explore the concept of custom connectors and my next blog post will be dedicated for just that.
Stay tuned!

1 thought on “Canvas Apps from scratch and exploring the camera control”